
An editor user is able to create 3D overlays in a scene.
A 3D overlay is an object positioned with 3D coordinates in a scene.
It is stable in a range of consecutive 360 images of the scene.
Start the 3D overlay creation:
There are three ways to create a 3D overlay in a scene:
First way:
Click on the “+” button (creation panel) and then click on the “Create overlay” button.

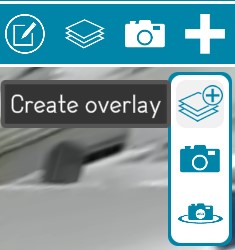
Second way:
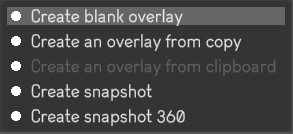
Click right on the “create blank overlay” button
Third way:
Click right on the “create overlay from copy” button
This functionality allows to copy and paste an existing 2D or 3D overlay of the environment.

Select the position for the 3D overlay:
Write the name of the 3D overlay:
A name is compulsory to create a 3D overlay.

Choose a content for the 3D overlay:
Choose a representation for the 3D overlay
Edit the position, size, orientation of the 3D overlay
The user must give it a name. The user will navigate in the scene’s 360 images, will choose a 360 image and will choose an initial orientation of the view that users will have when accessing the 3D overlay.
The representation of the 3D overlay will appear in the overlays list on the top right menu of the scene page.
Once a 3D overlay is created, the user may create 2D overlays in its content (except for 3D object, Word, Excel, Powerpoint and Basler).